Temenos Lifecycle Management Suite - Service Product Guide
Service Tickets
| End-User Guide > Service Tickets |
Service Tickets provide a standardized method to complete work. Tickets consist of one or more tasks to fulfill requests such as address changes and reordering checks.
Tickets optimize service by providing the capability for multiple users to work various tasks within a ticket simultaneously.
For example, the Fraud Department and Card Servicing can simultaneously work a Fraudulent Activity ticket. While the Fraud Department is completing such tasks as requesting a police report and confirming the validity of the claim, Card Servicing is able to coordinate the cancelation of the existing cards and issue new cards at the same time.
Listed below are the ticket details and the actions that can be taken while working a ticket:
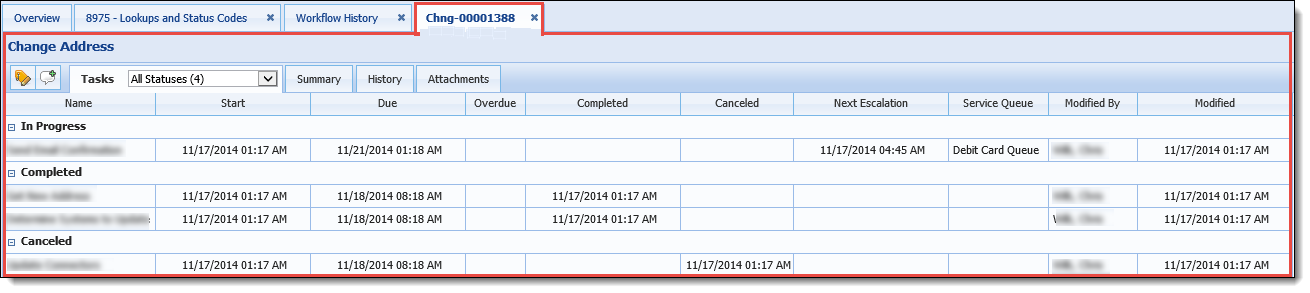
When a ticket is opened, it is displayed as a tab in the Overview section of the workspace and contains the name of the ticket type, and ticket details that are organized as tabs.
 |
The Ticket tab name displayed in the workspace is the ticket prefix and ticket number. The ticket prefix identifies the ticket type and the ticket number is unique for each ticket. The above image is a ticket with a prefix of Chng and ticket number 00001388.
|
Ticket details group characteristics of the ticket into tabs. The ticket's Summary, Tasks, History, and Attachment details are system defined and included for every ticket. By default, when a ticket is opened the first start up task is opened. Navigating back to the ticket opens the task tab by default.
Institutions may choose to include additional details for a ticket type that are presented in additional tabs when the ticket is opened.
For example, an institution wants users to be able to reference an account holder's Credit Card Detail and Delinquency Detail while reviewing a "Dispute Charges" ticket. These details are displayed as tabs when the "Dispute Charges" ticket is opened in the workspace.

Tasks are steps used to work a ticket. They provide a way to organize work and facilitate faster service. Each task within a ticket serves a specific purpose and produces results when it is completed. All tasks within a ticket must be closed (either Completed or Canceled) to complete a ticket.
The Task screen groups tasks into groups according to their current status. To be displayed on the task screen, the current status of a task must be In Progress, Waiting to Start, Completed, or Canceled.
|
Tasks that have a status of Completed and Canceled can be changed to In Progress by clicking on the task toolbar when the task is opened. For more information on Task statuses, please see the Tasks topic in this guide.
|
Status groups can be collapsed or expanded by clicking
next to the status name.
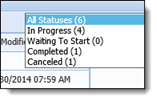
The Task screen can be filtered by status group using the drop-down list in the Tasks tab.
Additional tasks may populate on the Tasks screen based on the results of completed tasks. For example, a "Confirm Account Holder Information" task has two results: Changes Required or No Changes Required.
On the Task screen, the following information is provided for each task within a status group:
| Field | Description |
| Name | Displays the name of the task. |
| Start Date | Displays the date and time the task is started. |
| Due Date | Displays the due date and time of the task. |
| Overdue | If applicable, displays a  to indicate an overdue task. to indicate an overdue task. |
| Completed Date | If applicable, displays the date and time the task is completed. |
| Canceled Date | If applicable, displays the date and time the task is canceled. |
| Next Escalation Date | If applicable, displays the next escalation date and time of the task. |
| Service Queue | If applicable, displays the name of the current service queue. |
| Modified By | Displays the name of the most recent user to make a modification to the task. |
| Modified Date | Displays the date and time the most recent modifications to the task were made. |
Double-clicking a task in this list opens the task in a new window. When the task is open users can work, complete, or cancel the task.
|
Please see the Tasks topic for more information about working, completing, and canceling a task.
|
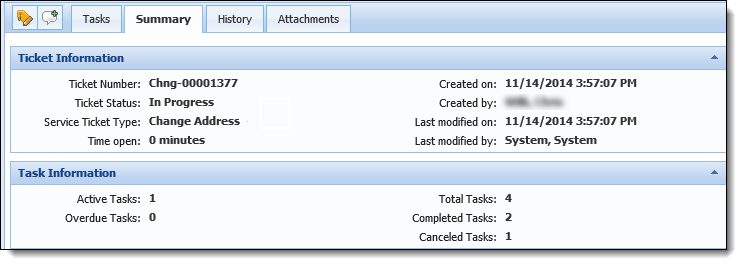
The summary tab provides an overview of ticket and task information.
| Categories | Details | ||||||||||||||||||||
| Ticket Information |
Ticket Information fields are system defined to provide an overview of the ticket.
|
||||||||||||||||||||
| Task Information |
Task information fields are system defined to provide an overview of tasks within a ticket.
|
By default Comment, Audit, and Attachment history are displayed, however, users can filter the history being displayed by selecting check boxes next to the desired history types, and clearing check boxes to hide a history type from the view.
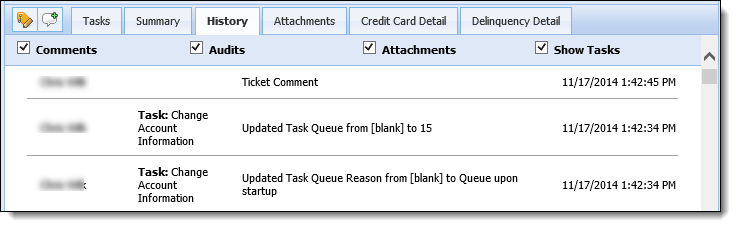
The fields displayed on the History screen are:
| Field | Description | ||
| User | Displays the name of the user that performed the action. | ||
| Details |
Displays a description of the action.
|
||
| Date | Displays the date and time of the action |
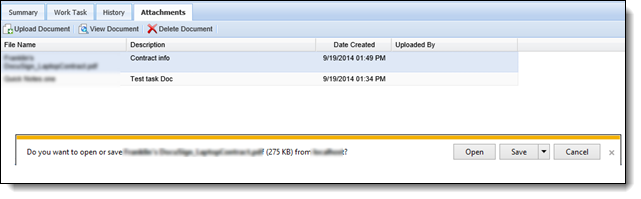
Attachments of any document type can be added to the ticket. Users may attach a document for a number of reasons.
For example, while working a "Fraudulent Activity Dispute" Ticket for fraudulent activity on an account, an institution may request that users attach an Account statement to the ticket that displays all account activity during the time in question.
|
A ticket can have multiple attachments. |

Details about the attachments are displayed on the Attachments screen:
| Field | Description |
| File Name | Displays the name given to the file when it was uploaded. |
| Description | Displays brief details for the purpose of the attachment. |
| Date Created | Displays the date and time the upload was added to the ticket. |
| Uploaded By | Displays the name of the user that uploaded the attachment. |
Create a new service ticket by navigating to the Tickets tab in the Left Navigation Panel of the workspace.
Hovering over a ticket type in the list provides a description of the ticket.
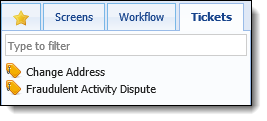
Select the desired service ticket type.
|
Search for a ticket type using the filter box. The filter box searches text in the ticket name as well as the ticket description. |
|
Clicking Cancel opens the ticket in the workspace but does not add the ticket to a related tickets panel. The ticket is added to the panel the next time the workspace is refreshed. |
A ticket can be worked by opening the ticket in the workspace and closing the tasks within the ticket. Users can take actions such as managing documents and changing the ticket status while working a ticket.
Existing Tickets can be accessed by working a service queue, through a search, or by selecting a ticket from the Related Tickets in the workspace.
Service Queue: While working a service queue, double-click a task in the list or select a task and click Open Ticket to open the ticket in the workspace.
Related Tickets: While a person is open in the workspace, click on the Related Tickets tab in the top area of the workspace. Double-click the desired ticket in the list to open it in the workspace.
|
For this information to appear, the Related Tickets panel must be configured to appear in the workspace. |
 |
The Related Tickets panel can be filtered by ticket type using the drop-down list at the top of the panel. The financial institution has the option of selecting to view All Tickets, Open/Closed Tickets, or tickets by type. |
The Change Status button on the ticket toolbar allows the user to change the status of the ticket. To close a ticket, the user must change the status to either Completed or Canceled.
To change the status of a ticket, click  .
.
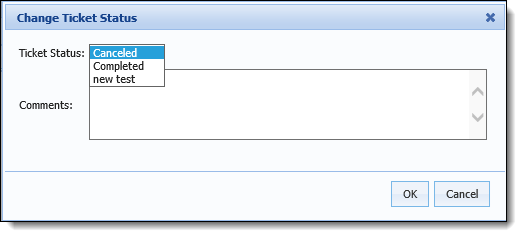
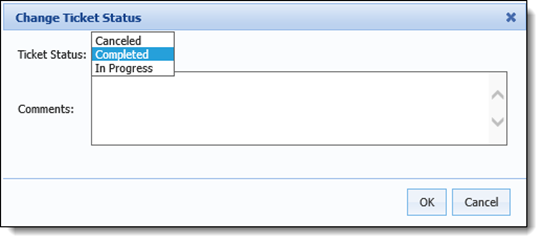
A change status screen appears containing two fields: Ticket Status and Comment.
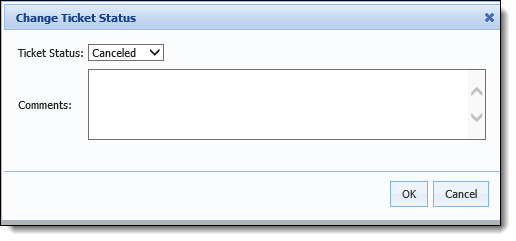
| Field | Description | ||
| Ticket Status |
Select the desired status from the list of available statuses in the drop-down. The current status of the ticket is not included in the drop-down. Also, if a Ticket status is not eligible it is not included in the drop-down list. For example, if all the tasks within a ticket, with status In Progress, have not been closed, the Complete status is not an option in the the drop-down.
|
||
| Comment | Enter comments to explain why the status is being changed. This field is optional. |
 |
The status of a ticket must be changed to Canceled or Completed to close a ticket. |
Canceling a Ticket:
A user can cancel a ticket by changing the status of the ticket. While a ticket is open, click  in the ticket toolbar.
Select Canceled from the ticket status drop-down.
|
Canceling a ticket is permanent. Once a ticket is canceled it cannot be reopened. |
Completing a Ticket
In order to complete a ticket, all tasks within the ticket must be closed (must have status of Completed or Canceled). Once all tasks are closed, the ticket is eligible for completion.
Complete a ticket by clicking in the Ticket toolbar and selecting Completed from the ticket status drop-down.
|
If all the tasks have not been resolved, the user does not have the option to complete the ticket. |
|
If a ticket type is configured to auto-complete by the system administrator in System Management > Service > Service Ticket Types, the ticket is automatically marked complete when no tasks are assigned to the ticket or when all of the assigned tasks are finalzied. When this configuration is set for a ticket type, the button is disabled in the Ticket toolbar. |
The Post Comment button in the ticket toolbar allows users to post a comment directly to a ticket.
To post a comment, click  .
.
A Post Ticket Comment box appears.
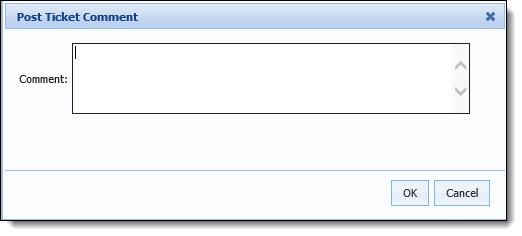
Insert the comment in the textbox.
Click OK to save the comment and close the Post Ticket Comment box. Click Cancel to return to the ticket without posting a comment.
|
All comments posted to a Ticket are also posted to the Person associated to the ticket and can be viewed in the Workflow History in the workspace. |
Documents on the ticket level can be uploaded, viewed or deleted from the Attachments tab within a ticket.

Upload Document
Click  to display the document upload screen.
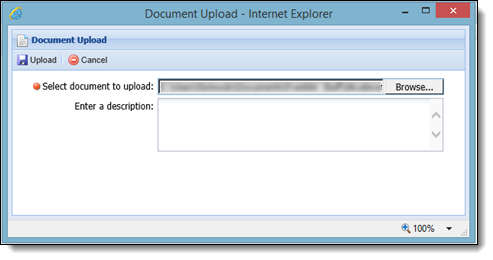
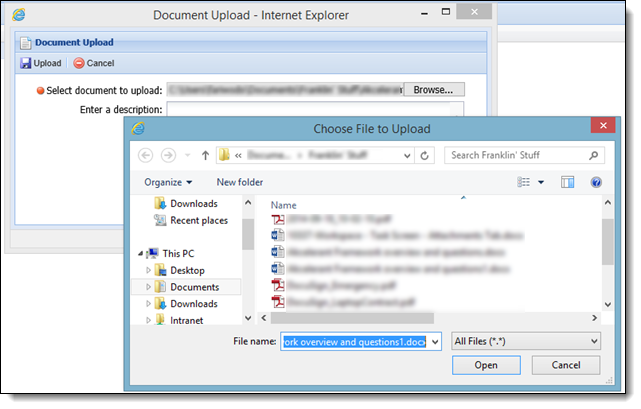
Click Browse... to locate the desired file to upload.
 to upload the document to the ticket and return to the Attachments tab. Click
  to return to the Attachments tab without uploading the document.
View Document:
 .
.
Delete Document:
 .
.